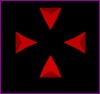
Command Wheel Options:
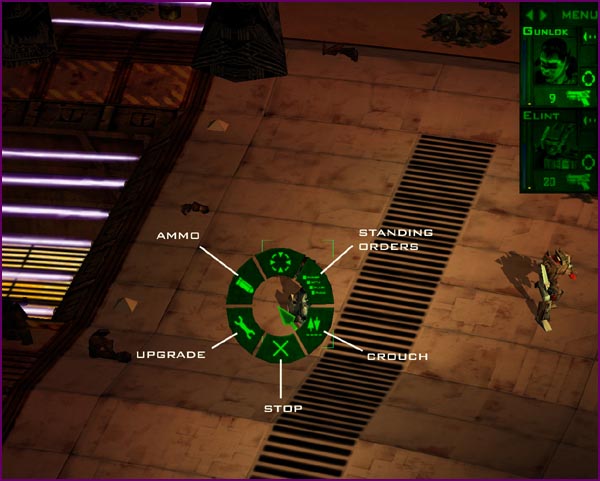
| The Command Wheel is a pop up menu used to control and customise the characters under your command. All the Command Wheel buttons have keyboard shortcuts. To activate the Command Wheel right click on a character. |
| - |
Left click on the Standing Orders button to set how a character responds to enemies. See the section on Standing Orders for more details. |
| - |
Left click on Crouch to make a character crouch. If your character crouches in a Scrap Pile or in water then it becomes almost undetectable. Click on Crouch again to make a crouched character stand back up. |
| - |
Left click on the Stop button to stop the character moving or firing. |
| - |
Left click on the Upgrade button to activate the Upgrade Screen. |
| - |
Left click on the Ammo button to select the ammunition type fired by the weapon. |
| - |
Right click or press Esc to close the Command Wheel. |
Standing Orders:
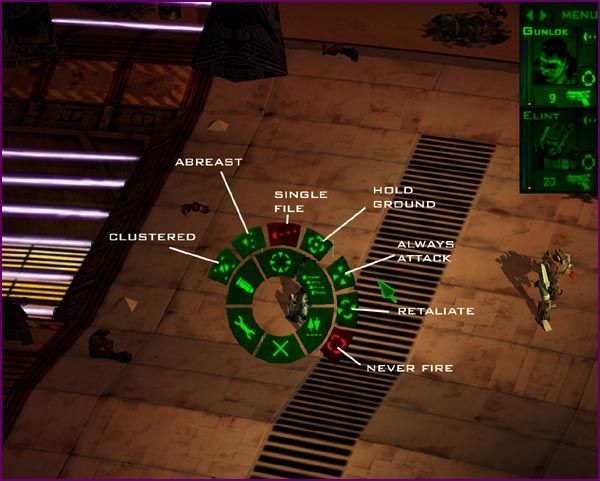
The Standing Orders define how a character responds to enemies and
enemy fire and how the characters arrange themselves when moving as a group. |
Formations:
╖ Clustered - the characters stand in a closely packed formation.
╖ Abreast - the characters stand in a line side by side.
╖ Single File - the characters stand in a line one behind another.
Fire Control:
╖ Hold Ground - the character will not move to attack an enemy if it is out of firing range.
╖ Always Attack - the character will fire at an enemy as soon as it is in range.
╖ Retaliate - a character will fire back at an enemy only when shot at. This is most useful during reconnaissance.
╖ Never fire - the character will only fire at an enemy when the player orders them to. |
Ammo Types:
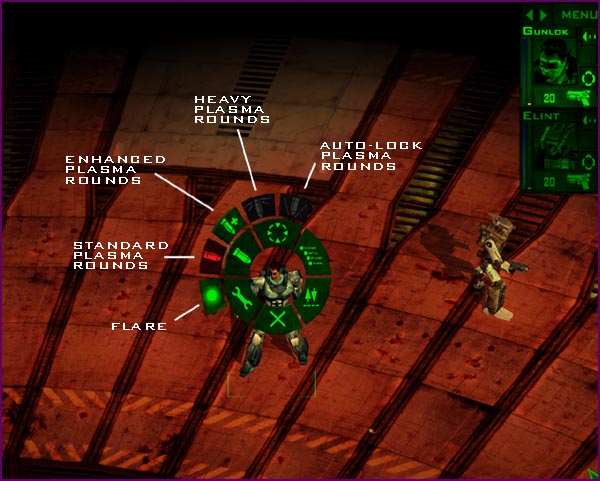
| The Ammo types will only appear if the character has a weapon. Only the Ammo types that can be used in the character's weapon are displayed. The currently selected Ammo type is highlighted in red. If an Ammo type button is dark green, then the character does not have any ammo of this type.
Left click on one of the Ammo type buttons to set the new Ammo type.
Flares can only be used with a plasma firing weapon and not with a laser weapon. Flares are very useful for illuminating dark areas before entering them. |
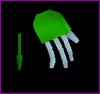
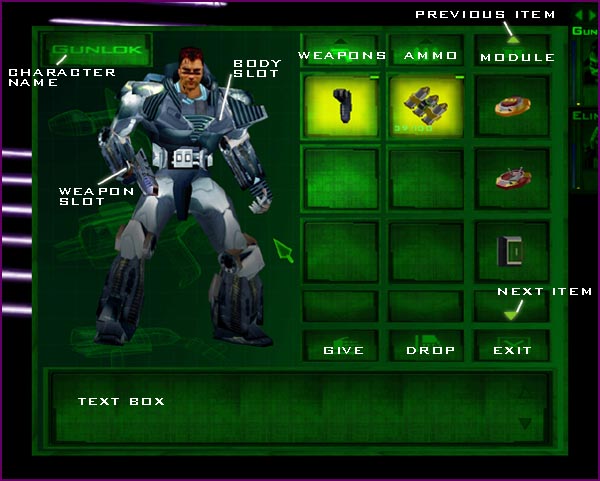
Upgrade Screen:
|
The Upgrade Screen is used to upgrade and customise your characters by adding extra weapons and equipment. The screen is divided into three main areas: |
| - |
The character window (on the left) shows the character and the equipment that is in use. Each character has several slots that can take items of equipment - the slots are on the arms, body and (for robot characters) head. To use an item it must be fitted in an arm slot, body slot or head slot. |
| - |
The text window (at the bottom) displays technical information about a character or item. |
| - |
The Inventory Area (on the right) shows the items that the character is arrying. |
| Items in the Inventory are arranged in three columns, weapons, mmo and modules. Next to each item you may see the following information: |
| - |
A green LED at the top right indicates that an item is equipped and in use. |
| - |
A red LED at the top right indicates that the character cannot use the item. |
| - |
A backlight indicates that an Ammo type can be used with the current weapon. |
| - |
Numbers next to Ammo indicate how many rounds there are remaining out of a aximum clip size. For example, 10/20 means there are 10 rounds remaining out of a maximum clip of 20. |
| Using the Upgrade Screen: |
| - |
To scroll through the items available in the Inventory, left click on the up and down arrows in the Inventory Area. |
| - |
To see a technical description of an item or character displayed in the text window, left click on the item or the character name. |
| - |
To place an item in a slot, left click and drag the item from the Inventory Area, dropping it over the slot. Weapons can only be put in the right arm slot. Some items can only be put in body or head slots. |
| - |
To quickly fit a character with an item, double click on the item in the Inventory Area. |
| - |
To quickly remove an equipped item, double click on it. |
| - |
To activate and drop a mine, double click on the mine in the Inventory Area. Alternatively, press the P, R, or T keys. |
| - |
To give an item to another character, drag the item over the other character's Task Bar button. Alternatively, left click on the item, left click on the Give icon and then left click on the character to give it to. Note, the giver and receiver must be close. If the two characters are too far apart, the giver will walk next to the receiver before giving the item. |
| - |
To drop an item, drag the item to the screen edge, and release the mouse button when the pointer changes to the Drop Hand. Alternatively left click on the item then left click on the Drop Icon. |
| - |
Left click on the Exit button to exit the Upgrade Screen. |
| - |
To rotate the character, hold down the left mouse button and move the mouse. |
| - |
To look at another character, left click on the character's Task Bar button at the right edge of the screen. |
Active Pause:
| This is an important way to get the best out of the teamwork strategy in the game. It is very useful in difficult and complicated situations. It is especially useful to create waypoints and stacks of several commands - see Waypoints and Queued Commands below.
Press the Pause key to pause the game and text at the bottom left of screen will say 'Active Pause'. When in Active Pause mode you can do everything you do in normal game play, for example, move the camera, scroll the screen, upgrade and move characters. However, the commands only happen when Active Pause mode is switched off.
Press the Pause key to unpause the game and your characters immediately start following the orders you have issued.
Alternatively, you can trigger one character at a time using the 1, 2, 3 or 4 (see below). As soon as you start any character the game unpauses.
Use the 1, 2, 3 and 4 keys to start off each of your characters: |
| - |
1 Gunlok |
| - |
2 Elint |
| - |
3 Hark |
| - |
4 Frend |
| You can override a character's stored orders at any time by selecting the character and issuing them a new order. |
Waypoints and Queued Commands:

|
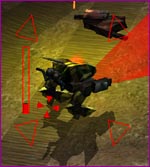
Waypoints and paths are very important method to get the best out of the strategy in the game. They allow you to carefully coordinate all of your characters and issue detailed lists of commands to them.
A series of waypoints that make a path can be issued at any time in normal play and in Active Pause mode. You can issue and command as Pick up and Attack commands as part of a path, for example, pick up, attack, conceal, change weapon etc. A path is indicated as a green line with numbered waypoints. An attack command is indicated as a red line.
Hold down CTRL and left click on each location, scrap pile or enemy in turn to issue a series of orders to your character.
Holding down the CTRL key will show the waypoints and list of commands for all selected characters.
To delete the most recent way point or command press the back slash key.
To cancel a path of waypoints, release the CTRL key and select a new destination.
The order of commands is important. For example, if you select Attack and then Goto, you character will move and shoot at the same time. If you select Goto and then Attack your character will go to the destination and then shoot. |
Strategy:
|
If you use strategy carefully you will find that you will do much better. Here are a few tips to help you. As you play you will discover many more useful strategies of your own.
Search all junk and scrap piles, they may contain useful items. You should look carefully for scrap piles, as they can sometimes be difficult to see. Use all the upgrades you can, they can often be combined.
Your characters have special abilities - to succeed you must learn about their strengths and weaknesses. Not all characters can use all weapons. Only Frend can use the heaviest weapons. Your resources are limited, don't waste the most powerful ammo on the weakest enemies. You don't always need to destroy every enemy to complete a mission.
Your characters are right-handed, so are best at shooting right-handed round corners.
The higher a character is the further some weapons can fire. The enemy indicators show whether an enemy is in range of a character.
To fire grenades over walls use the SHIFT key to fire them in a higher trajectory.
Some characters are not very accurate at shooting - a Target Imager can improve their accuracy.
Use the Active Pause to set up more complicated and co-ordinated attacks.
Use all available cover such as walls, old vehicles and rocks to conceal and protect your characters from enemies. Most cover will take a few shots before being destroyed. |
 |
Barrels can take several hits, but then will explode, useful to destroy some enemies but are dangerous if close to your characters. |
Enemy Behaviour:
|
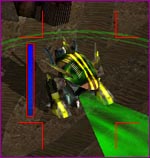
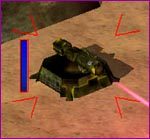
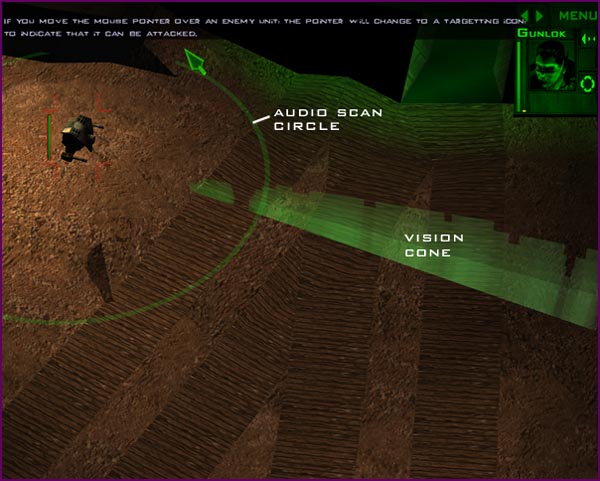
When you can see an enemy, you will also see that it has a coloured Vision Cone and Audio Scan Circle. The Vision Cone shows what the enemy can see; the Audio Scan Circle shows what the enemy can hear.
The colour of the Vision Cone and Audio Scan Circle indicates the alert status of the enemy: |
| - |
Green - the enemy is in Patrol Mode and has not detected any of your characters. |
| - |
Blue - the enemy is in Alarm Mode and has detected one of your characters. Any other enemies in range of this signal are also alerted. |
| - |
Red - the enemy has detected one of your characters and locked on. Time to get out of there or destroy it! |
| - |
Orange - the enemy has lost target lock and is actively scanning to reacquire the target. The enemy may go to the target's last known location. If the enemy fails to re-establish a lock after a few seconds, it switches back to Patrol Mode and returns to its original co-ordinates or starts to patrol the area it last detected a target in. |
| - |
Purple - some enemies use alternative scanning technology that cannot be hidden from. |
| The first time you encounter a new enemy, proceed cautiously until you know more about its capabilities - use a plasma weapon to fire flares to look ahead and use the 1st person Recon Mode to get more detailed technical information on an enemy. Enemies that look the same may not have identical capabilities. Learn the behaviours of enemies and their strengths and weaknesses.
Mines are particularly useful to destroy stronger enemies especially when placed near exploding barrels. You will need to place the mines carefully and entice enemies towards them. Proximity and Remote Mines are best for destroying moving enemies. Timed mines are best used on static targets such as turrets and walls - they can be difficult to use against moving targets. Don't waste mines on weaker enemies.
Don't stand still and get shot at! Gunlok and Hark should be fast enough to run round the slower turning enemies without getting shot.
Some turrets have limited traverse and cannot shoot you if you get behind them. |
Hiding from Enemies:
| Characters can hide from enemies in two main ways: |
| - |
Hide behind any solid cover such as walls, rocks, wrecked vehicles etc. as in the real world. Use Crouch to hide behind lower obstacles. |
| - |
Cloak in water or scrap piles using Crouch. When your character is cloaked it fades to a darker colour and is almost undetectable by enemies. If a character is not cloaking when you select Crouch it is because it needs to be nearer to the scrap pile or deeper in the water. |
Laser Control Boxes:
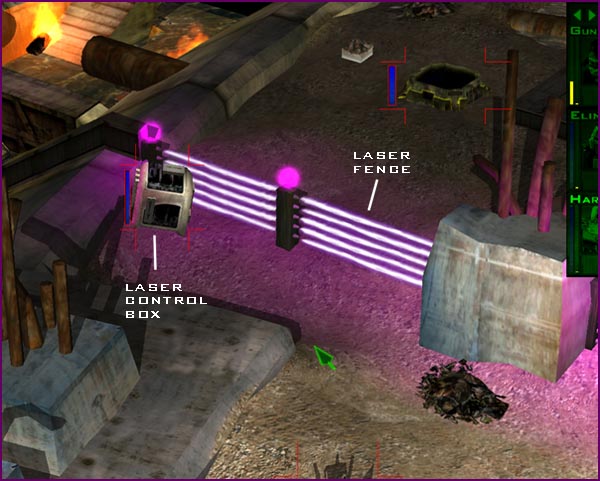
| Laser Control Boxes are armoured boxes that control and provide power to the laser security fences. Deactivate or destroy them to open fences. If you destroy them the explosion sound may attract the attention of enemies. Some of the Laser Control Boxes are heavily shielded and may require you to use Elint to shut them down. |
Multiplayer Games:
| Gunlok is not just a single player game - in the final version you can also play a number of multiplayer games including: |
| - |
Capture the flag |
| - |
Rescue the president |
| - |
Death match |
| - |
Co-operative play on single player levels |
| Gunlok uses Direct Play and can operate over a Serial Connection, Modem, Local Area Network using TCP/IP or IPX and over the Internet. The performance of the game will vary according to the type of connection. |
NOTICE:
Rebellion reserves the right to make modifications or improvements to the product described in this manual at any time and without notice.
COPYING PROHIBITED:
This software product and the manual are copyrighted and all rights are reserved by Rebellion and are protected by the copyright laws that pertain to computer software. You may not copy the software except that you may make a single copy for backup purposes only. You may not loan, sell, rent, lease, give, sub-license, or otherwise transfer the software (or any copy) unless expressly permitted to do so by Rebellion. You may not modify, adapt, translate, create derivative works, decompile, disassemble, or otherwise reverse engineer or derive source code from, all or any portion of the software or anything incorporated therein or permit any third party to do so. Gunlok and the Rebellion logo are registered trademarks. 2000 AD, Hark, Elint, Frend, Maskelyn, Skaran, Cytox, Morger and Grubertech are trademarks. |